How to Size Solar Panels for Your Home: Complete DIY Guide
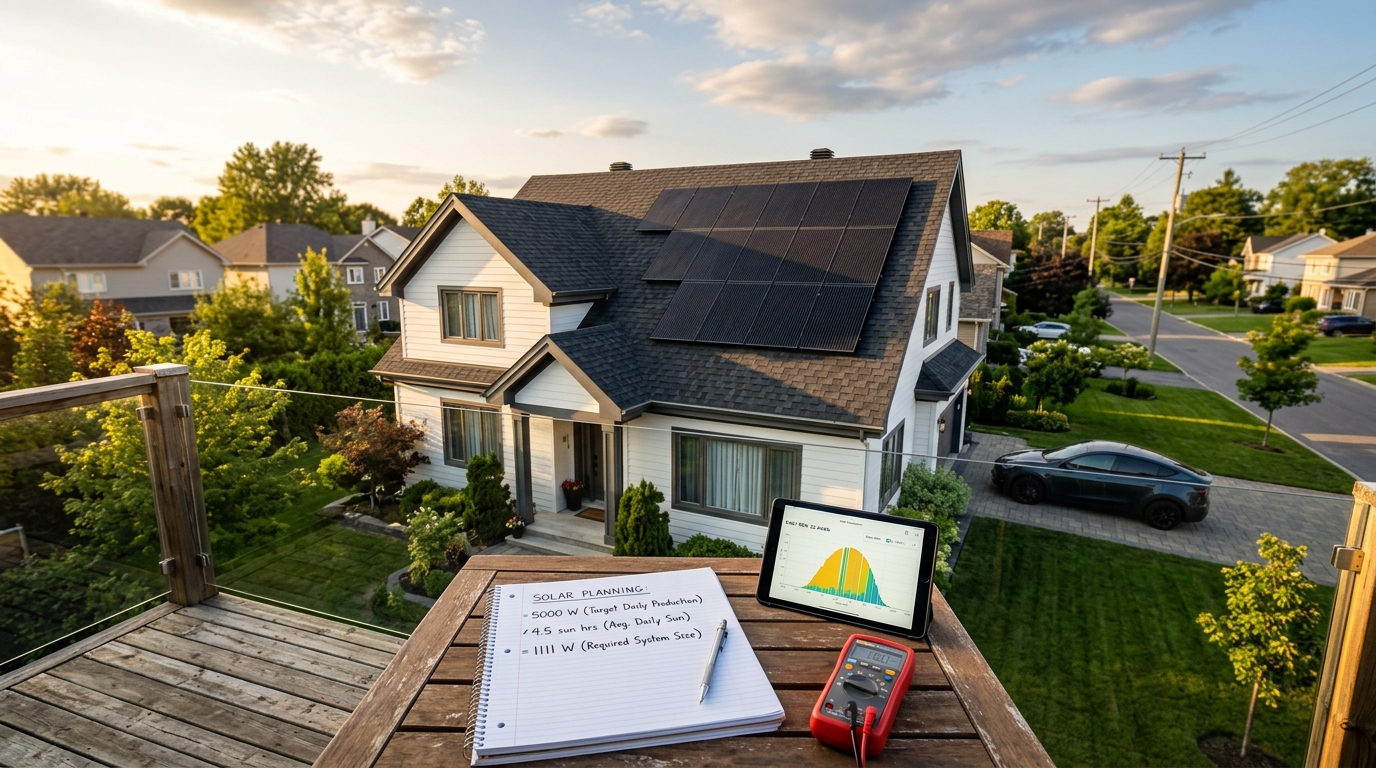
Short answer: To size a solar array, divide your daily kWh usage by your local peak sun hours, then divide by a 0.75 derate factor. That gives you required DC kilowatts of panels. For a home using 20 kWh/day at 4.5 peak sun hours: 20 / 4.5 / 0.75 = 5.9 kW of panels (about 15 modern 400W modules).
Solar panel sizing is the single most important calculation in a DIY build. Get it right and your system covers your loads with room to grow. Get it wrong and you either waste money on panels you don’t need or chase a shortfall every winter. I’ve run these numbers for my own Rhode Island home and for dozens of other builds, and the math is simpler than most beginners fear.
This guide walks you through the same process I use. We’ll start with daily consumption, apply peak sun hours for your region, layer in the PVWatts loss model, and end with three worked examples covering a shed, a small home, and a whole-house build.
The Core Sizing Formula
Every sizing calculation comes down to one equation. Memorize this and you can size a system on the back of a napkin:
Required DC kW = Daily kWh / (Peak Sun Hours x Derate)The derate factor accounts for the gap between nameplate panel ratings and real-world output. I use 0.75 as a conservative rule of thumb for DIY builds. NREL’s PVWatts uses a tighter 0.86 derate (14.08% total losses) because it assumes professional installation with minimal shading and clean wiring. For a margin-of-safety number on your own build, 0.75 is smarter — it bakes in a buffer for dirty panels, sub-optimal tilt, and the occasional cloudy week.
I’ll show both numbers in the examples so you can decide which fits your situation.
How Do I Calculate My Daily kWh Consumption?
Pull your last 12 months of electric bills. Add up the kWh column, then divide by 365. That’s your average daily consumption — the most important number in this entire guide.
The average US household uses about 30 kWh/day according to EIA data. My household in Rhode Island runs closer to 25 kWh/day because we’ve swapped to LED lighting and heat pumps, though winter spikes push us to 40+ kWh on cold days. Your number will vary based on climate, EVs, electric heat, and pool pumps.
For off-grid builds on new properties without billing history, list every load individually. A typical refrigerator uses 1.5 kWh/day. LED lights across a small home total about 0.5 kWh. A window AC unit burns 3-5 kWh/day in summer. Sum the wattage times hours-per-day for each appliance.
Don’t forget seasonal swings. If you’re sizing for year-round off-grid use, size to your worst month — usually December or January in the northern hemisphere. Grid-tied homes can average across the year because the grid handles the monthly imbalance.
What Are Peak Sun Hours and Why Do They Matter?
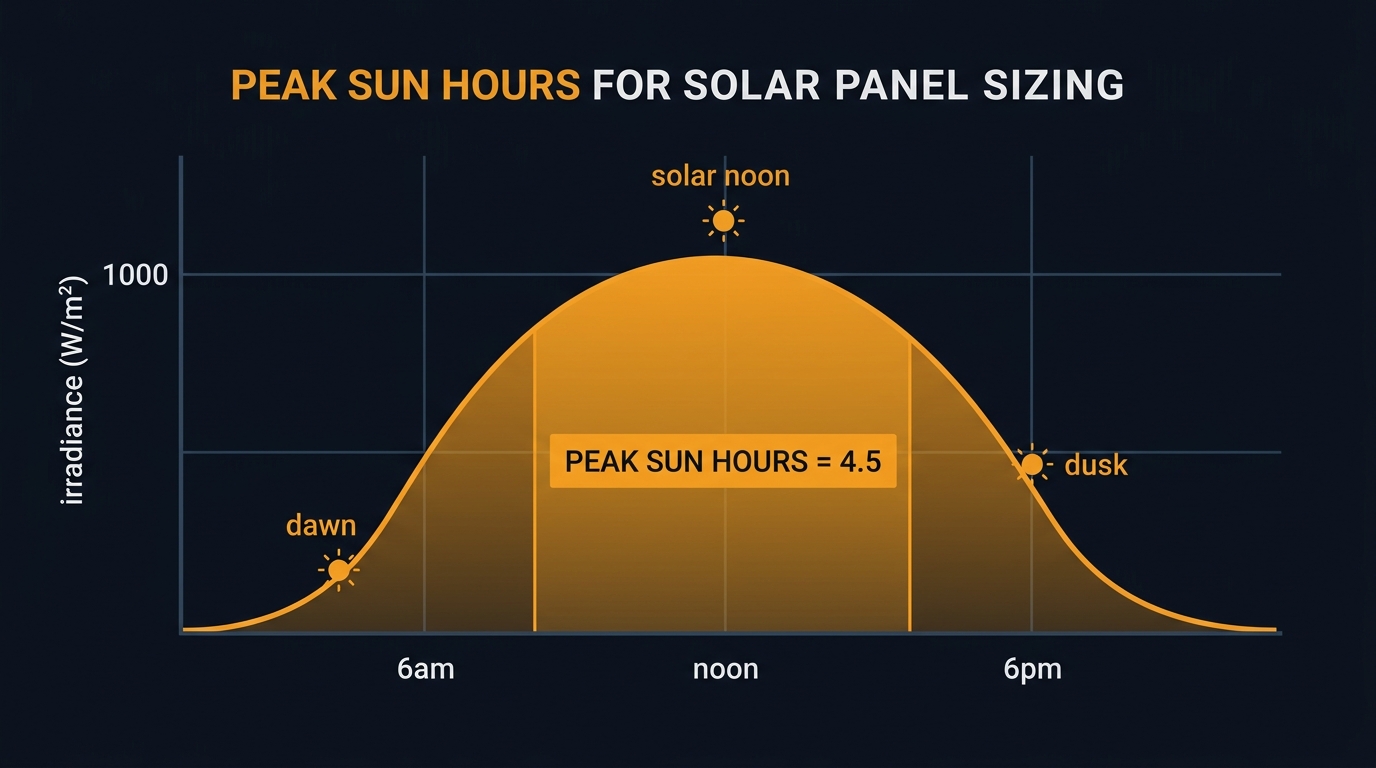
Peak sun hours (PSH) is the number of hours per day that solar irradiance averages 1,000 W/m² — the standard test condition used to rate panels. It is not the number of daylight hours. A location that gets 14 hours of daylight might only deliver 4.5 peak sun hours because most of those hours have the sun at lower angles or filtered through clouds.
PSH varies dramatically by region:
| Region | Annual Avg PSH | Winter Low | Summer High |
|---|---|---|---|
| Pacific Northwest (Seattle) | 3.6 | 1.5 | 5.8 |
| Northeast (Boston, Providence) | 4.2 | 2.5 | 5.5 |
| Midwest (Chicago) | 4.3 | 2.7 | 5.7 |
| Southeast (Atlanta) | 4.9 | 3.3 | 5.8 |
| Southwest (Phoenix) | 6.5 | 4.8 | 7.8 |
| California Central Valley | 5.8 | 3.6 | 7.5 |
For my Rhode Island site I use 4.2 PSH as the annual average and 2.5 PSH for worst-case winter sizing. Those numbers come straight from the PVWatts calculator (formerly at pvwatts.nrel.gov, now hosted by the National Laboratory of the Rockies), which uses typical meteorological year (TMY) data aggregated from decades of station measurements.
If you want precise numbers for your exact address, PVWatts is the authoritative source. Plug in your ZIP code, hit “Go to system info,” and the tool spits out monthly PSH values for your specific latitude, elevation, and climate. It takes about 90 seconds and costs nothing.
Understanding Derate Factors (the PVWatts Model)
Panels never produce their full nameplate rating in real conditions. A 400W panel might realistically deliver 320-340W at solar noon in perfect weather. Over a full day, the average is lower still. Derate factors capture this reality.
NREL’s PVWatts defaults to a 14.08% total loss assumption, which comes from stacking these individual losses:
| Loss Category | Default % |
|---|---|
| Soiling (dust, pollen) | 2.0% |
| Shading | 3.0% |
| Snow | 0% |
| Module mismatch | 2.0% |
| DC wiring | 2.0% |
| Connections | 0.5% |
| Light-induced degradation | 1.5% |
| Nameplate tolerance | 1.0% |
| Age | 0% |
| Availability (downtime) | 3.0% |
| Total (combined) | 14.08% |
Those losses combine multiplicatively, not by simple addition, which is why the total is 14.08% rather than 15%. That leaves a derate factor of 0.86 from DC nameplate to delivered AC energy at the meter.
For DIY builds I apply an extra safety margin and use 0.75 instead. The reason: most DIY installs have imperfect tilt angles, some shading from trees that wasn’t there when I sized the array, and wiring runs that weren’t optimized by a pro crew. Over-sizing by that extra 10-15% is cheap insurance against disappointing production numbers.
You also need to decide on a DC-to-AC ratio. PVWatts defaults to 1.2 — meaning 20% more DC panel capacity than inverter AC capacity. This oversizing is economical because panels are cheaper per watt than inverters, and the extra DC captures energy during shoulder hours when the inverter isn’t saturated. Most modern hybrid inverters support 1.3-1.5x DC oversizing without clipping concerns.
How Do I Choose Panel Wattage?
Modern residential panels in 2026 cluster in the 400-450W range for standard 72-cell modules. You’ll occasionally see 500W+ commercial-format panels, but those are awkward to handle on a roof and rarely worth the savings for DIY.
Here’s what I consider when choosing wattage:
- Roof space is limited → Go higher wattage (430-450W). You want every square foot producing as much as possible.
- Ground mount with room to spare → Lower wattage (380-400W) often wins on dollars-per-watt. Extra panels cost less than premium modules.
- Temperature coefficient below -0.30%/°C → Look for this on the datasheet. Panels with better thermal performance lose less energy in hot summer conditions.
- 25-year performance warranty, 12+ year product warranty → Standard for any Tier 1 manufacturer. Walk away from anything less.
For my own roof I run 420W monocrystalline panels because I ran out of unshaded roof area at around 6 kW. If I had ground-mount space available, I’d have chosen cheaper 400W modules and added two more.
Roof Space and Physical Constraints
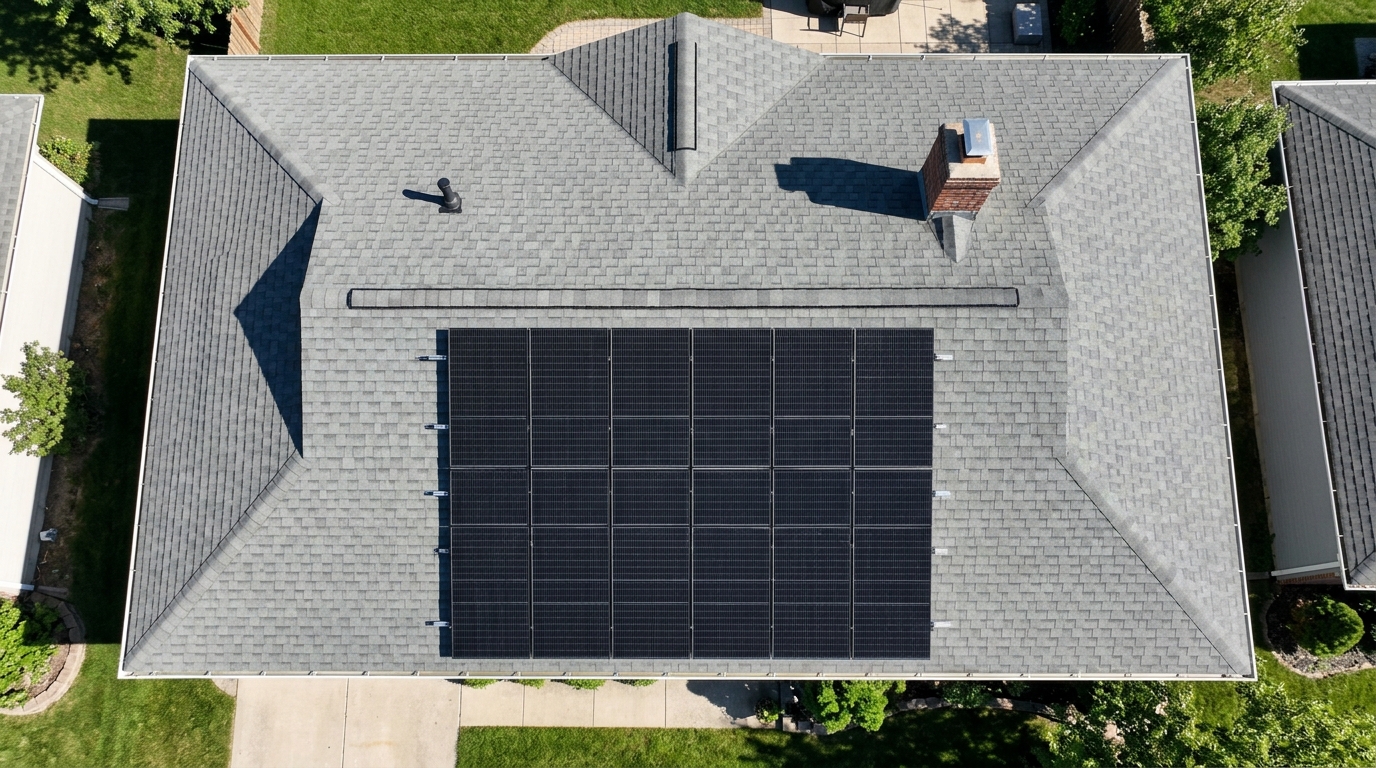
Modern 400-450W residential panels measure roughly 68” x 40” — about 19 square feet each. Add ~6 inches of spacing between panels for mounting hardware and you need approximately 22 square feet per panel installed.
Quick math: a 10 kW array of 400W panels requires 25 panels, or about 550 sq ft of usable roof space. That’s a significant chunk of a typical roof face, and it assumes no vent pipes, chimneys, or dormers in the way.
Before you commit to a panel count, walk your roof (or pull up satellite imagery) and identify:
- Unshaded area — even partial shade from a single tree branch can collapse the output of a whole series string.
- Roof orientation — south-facing is ideal in the northern hemisphere, but east and west facets work at ~85% of south production.
- Obstructions — vents, skylights, HVAC units, and the required 18-36” setback from roof edges per local fire code.
- Structural capacity — rafters and trusses must handle the added dead load plus wind uplift. An older roof may need structural upgrades.
If your roof can’t host enough panels, ground mounts are an excellent alternative. I built a small ground mount for supplemental panels after filling my main roof, and it produces just as well as the rooftop array.
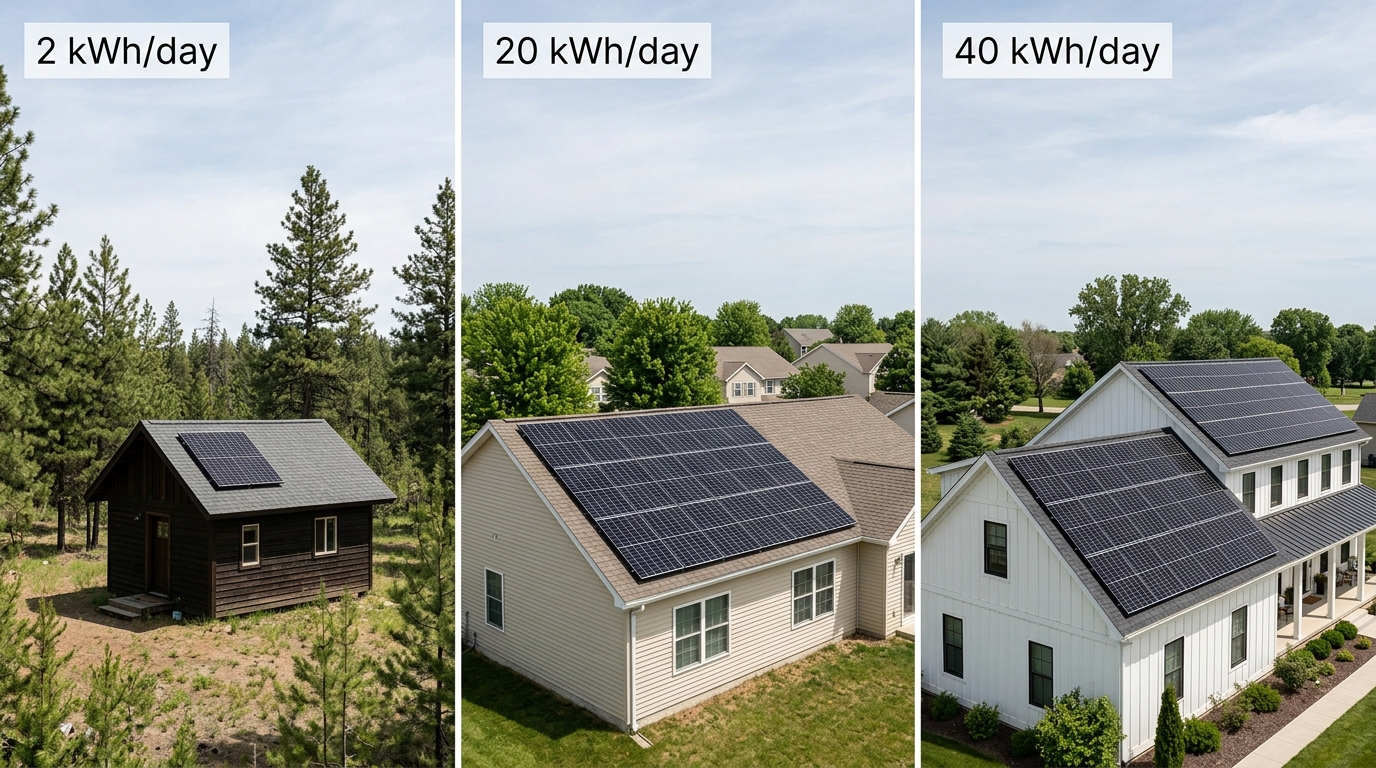
Example 1: Small System (2 kWh/day Shed)
Let’s size a small system for an off-grid shed or tiny cabin using 2 kWh/day — just lights, a small refrigerator, phone charging, and a laptop.
Inputs:
- Daily load: 2 kWh
- Location: Rhode Island (4.2 PSH annual average, 2.5 PSH winter worst case)
- Derate: 0.75 (DIY safety margin)
Calculation (annual average):
2 kWh / (4.2 x 0.75) = 0.63 kW of panelsThat’s a single 630W-equivalent — easily met with two 400W panels in parallel, giving you 800W of nameplate capacity. The oversize covers winter shortfall and leaves margin for cloudy stretches.
Worst-case winter check:
2 kWh / (2.5 x 0.75) = 1.07 kWTwo 400W panels still cover this comfortably. If you expect heavy winter use, bump to three panels (1.2 kW) for a full year-round off-grid setup. Total panel cost: roughly $250-$400. Pair this with a small MPPT controller (see the MPPT charge controller guide) and a single 100Ah LiFePO4 battery.
Example 2: Medium System (20 kWh/day Small Home)
A small energy-efficient home or a partial-offset system for a larger home. 20 kWh/day is the realistic target for anyone who’s done basic efficiency upgrades (LED, heat pumps, smart thermostat).
Inputs:
- Daily load: 20 kWh
- Location: Rhode Island (4.2 PSH)
- Derate: 0.75
Calculation:
20 / (4.2 x 0.75) = 6.35 kWRound up to 6.4 kW — that’s sixteen 400W panels or fifteen 430W panels. With PVWatts’s tighter 0.86 derate you’d only need 5.5 kW, but I’d still build it at 6.4 kW to cover shading losses and winter shortfall.
Inverter sizing using the 1.2 DC:AC ratio: 6.4 kW DC / 1.2 = 5.3 kW AC inverter. A 5 kW or 6 kW hybrid inverter fits perfectly. For panel string wiring options, see solar panel wiring: series vs parallel.
This is roughly the size of my own home system. Paired with a 10 kWh LiFePO4 battery bank, it covers about 80% of annual consumption and keeps critical loads running during outages. The DIY LiFePO4 battery bank guide walks through the battery side of the build.
Example 3: Large System (40 kWh/day Whole Home)
A larger home with electric heat, an EV, or a pool pump. 40 kWh/day is common for all-electric households and anyone with two EVs like mine.
Inputs:
- Daily load: 40 kWh
- Location: Rhode Island (4.2 PSH)
- Derate: 0.75
Calculation:
40 / (4.2 x 0.75) = 12.7 kWRound to 12.8 kW — thirty-two 400W panels or thirty 430W panels. That’s a large array requiring roughly 700 sq ft of roof or ground space.
For a system this size, I’d actually push toward 14-15 kW DC to account for winter months and EV charging spikes. With a 1.2 DC:AC ratio, pair it with a 10-12 kW inverter (often two inverters in parallel for reliability). Wire sizing becomes critical at this scale — consult the solar wire gauge chart before pulling cable.
At DOE’s reported average residential system size of 7.15 kW DC, this example sits nearly double the national average. That’s fine — you’re sizing to your loads, not to an average.
Matching Panels to Your Charge Controller or Inverter
Sizing the array is only half the job. The panels have to play nicely with your MPPT charge controller (in battery-based systems) or your string inverter (in grid-tied systems). Two constraints matter most:
- Maximum PV input voltage — cold-weather Voc must stay below the controller’s ceiling. Cold mornings push Voc 15-25% above the STC rating.
- Maximum PV input current — Isc times 1.25 times 1.25 (NEC 690.8) must stay within the controller’s rated PV current.
On my Rhode Island site with a design-low temperature of -20°C, a 48V panel with β = -0.28%/°C corrects to roughly 54V Voc. Four in series hits 216V — safely under a 250V controller’s ceiling. The full string-sizing math lives in the MPPT charge controller guide, including the NEC 690.7 cold-correction tables.
If you’re running a grid-tied string inverter, check both the maximum Voc and the minimum MPPT start voltage. A string that fits the ceiling in winter might drop below the MPPT window on a 90°F summer afternoon when cell temperatures hit 70°C.
Putting It All Together
Here’s the condensed sizing workflow I use for every build:
- Pull 12 months of electric bills — calculate daily kWh average and worst-month kWh.
- Look up your peak sun hours on PVWatts or use my regional table above.
- Apply the formula — daily kWh divided by (PSH × 0.75) gives required DC kW.
- Round up — panel wattage granularity means you’ll always land slightly above the target.
- Check roof space — ~22 sq ft per panel including spacing.
- Size the inverter — target a 1.2 DC:AC ratio to match PVWatts defaults.
- Verify MPPT compatibility — cold Voc and hot Vmp must both stay in window.
- Pick your battery bank — see the best LiFePO4 batteries for 2026 roundup for tested options.
This entire process takes about an hour of honest planning. Most of the mistakes I see come from skipping step 1 (guessing at daily consumption) or ignoring step 6 (mismatching panels to inverter capacity). Don’t skip those two.
For a second opinion on the math, the US Department of Energy’s Homeowner’s Guide to Going Solar covers the same process from a professional-install perspective, and notes that the average US residential system is 7.15 kW DC — useful context for sanity-checking your own target.
Next Steps
You’ve got the sizing fundamentals. Here’s how to move forward:
- Run the numbers in our sizer — the Solar System Sizer automates every calculation in this guide, including location-specific peak sun hours and component recommendations.
- Read the full beginner’s overview — if you’re new to DIY solar, start with Getting Started with DIY Solar for the broader context on components and system types.
- Plan your charge controller — once you have a panel count, the MPPT charge controller guide walks through string sizing and Voc math.
- Design your wiring — check the solar wire gauge chart while shopping for cable. Undersized wire will cost you more than any other planning mistake.
- Pick your panel wiring topology — series vs. parallel wiring explains the tradeoffs.
- Build your battery bank — the DIY LiFePO4 battery bank guide covers cell selection, BMS choice, and charge parameters.
The best sizing decision is an honest one. Use your actual kWh usage, not a wish-list number. Pad your panels by 15-25% over the minimum. Then build with confidence knowing the math is on your side.
Frequently Asked Questions
How many solar panels do I need for a 2,000 sq ft house?
Square footage is the wrong input — use kWh, not floor area. The average US home uses about 30 kWh/day, which typically needs 7-9 kW of panels (about 18-22 modern 400W panels). Pull your electric bill, divide monthly kWh by 30, then run the formula in this guide.
What is the PVWatts 14.08% loss assumption?
NREL's PVWatts calculator defaults to 14.08% total system losses, combining soiling (2%), shading (3%), mismatch (2%), wiring (2%), connections (0.5%), light-induced degradation (1.5%), nameplate tolerance (1%), and availability (3%). That leaves you a derate factor of about 0.86 from DC nameplate to real-world output.
How many peak sun hours does my location get?
Peak sun hours (PSH) range from about 3.5 in the Pacific Northwest and northern New England to 6.5 in the desert Southwest. I get roughly 4.2 PSH here in Rhode Island on an annual average. Look up your site on PVWatts for a precise monthly breakdown.
Should I oversize panels relative to my inverter?
Yes. PVWatts uses a default DC-to-AC ratio of 1.2, meaning 20% more DC panel capacity than inverter AC nameplate. That captures more energy during non-peak hours and costs less than upsizing the inverter. Most hybrid inverters allow 1.3-1.5x oversizing.
Are 450W panels better than 400W panels for home use?
If roof space is limited, yes — higher wattage packs more production into the same footprint. For ground mounts with open space, 400W panels often have better dollars-per-watt. Check the datasheet's temperature coefficient and efficiency, not just the nameplate.
Can I undersize my solar array and make up the difference with the grid?
Absolutely — this is how most grid-tied systems work. You're not required to offset 100% of your usage. Many homeowners size for 60-80% offset to maximize ROI, since the last few kWh of offset have diminishing returns under current net metering rules.
Anthony
Solar homeowner, EV driver, and DIY builder. Using solar to power a large part of my home.
Get build guides in your inbox
Weekly solar builds, product tests, and technical deep-dives.
Subscribe Free