How to Build a DIY LiFePO4 Battery Bank: Complete Guide
Short answer: Building your own LiFePO4 battery bank can save you 30-50% over pre-built options. You’ll need matched cells, a proper BMS, appropriately sized fusing, and about a weekend of careful work. For most DIY solar setups, a 48V configuration makes the most sense because it keeps current low and lets you use smaller (cheaper) wiring.
Why LiFePO4 for Solar Storage
I’ve built battery banks using different approaches — lead-acid, pre-built LiFePO4 units, and raw prismatic cells. The raw cell build took the most time, but gave me the best dollar-per-kWh ratio and the deepest understanding of what’s actually happening inside the box.
LiFePO4 (lithium iron phosphate) has become the standard chemistry for DIY solar, and for good reason:
- Cycle life: 3,000-6,000 cycles at 80% depth of discharge. That’s 8-15 years of daily cycling.
- Safety: LiFePO4 is the most thermally stable lithium chemistry. Nail-penetration tests show these cells handle abuse far better than NMC or other lithium chemistries.
- Efficiency: 95-98% round-trip efficiency. Lead-acid loses 15-20% to heat, which means you need more panels to charge them.
- Flat discharge curve: A LiFePO4 cell holds ~3.2V across most of its capacity range. Your inverter sees a stable voltage whether the bank is at 90% or 20%.
- Weight: About half the weight of equivalent lead-acid capacity.
The only real drawback is upfront cost. But when you calculate cost per cycle over the life of the battery, LiFePO4 wins by a wide margin. Run the numbers yourself with our Battery Bank Calculator.
Pre-Built vs. Raw Cells: Which Should You Choose?
This is the first decision you need to make, and it depends on your comfort level with electrical work.
Pre-Built Batteries
Pre-built LiFePO4 batteries come as complete units — cells, BMS, enclosure, and terminals all integrated. You bolt them together, wire them up, and go.
Good pre-built options I’ve worked with:
- EG4 LL-S 48V 100Ah server rack battery — Solid BMS, built-in heating for cold climates, stacks cleanly in a server rack. Around $1,200-1,400. These are what I’d recommend for most people building a 48V system.
- LiTime 12V 200Ah — Great price point for 12V systems, decent BMS. About $400-500 each. Four of these in series make a solid 48V bank.
- SOK 12V 206Ah — Slightly better BMS specs than LiTime, good Bluetooth monitoring, priced a bit higher at $500-600.
- Battleborn 100Ah 12V — The original mainstream LiFePO4 battery. Good quality, but you pay a premium for the name at $800+.
Pre-built is the right call if you want minimal fuss and don’t mind paying 30-50% more per kWh. For a head-to-head comparison of the best pre-built options, see our best LiFePO4 batteries for 2026 roundup.
Raw Prismatic Cells (DIY Build)
Raw cells — usually 280Ah or 304Ah EVE, CATL, or Lishen prismatic cells — give you the lowest cost per kWh. You’ll source the cells, buy a standalone BMS, and assemble everything yourself.
What you gain: Lower cost, full control over BMS selection, ability to build exact capacities.
What you lose: Time, warranty support, and the safety net of factory QC.
In my experience, a 48V 280Ah (14.3 kWh) battery bank from raw cells costs roughly $1,500-2,200 depending on cell source and BMS choice. The same capacity in pre-built units runs $2,800-4,000.
Understanding Series and Parallel Configurations
Before you start buying cells, you need to understand how series and parallel connections work. This matters because it determines your bank’s voltage and capacity.
For a deeper look at wiring theory, check out our guide on series vs parallel wiring — the same principles apply to batteries.
Series: Increases Voltage
Connecting cells in series adds their voltages together while keeping capacity (Ah) the same.
- 4 x 3.2V cells in series = 12.8V (nominal “12V” battery)
- 8 x 3.2V cells in series = 25.6V (nominal “24V” battery)
- 16 x 3.2V cells in series = 51.2V (nominal “48V” battery)
Parallel: Increases Capacity
Connecting cells in parallel adds their amp-hour ratings while keeping voltage the same.
- 2 x 280Ah cells in parallel = 560Ah at the same voltage
Why 48V is Usually Best
Higher voltage means lower current for the same power output. Lower current means smaller wires, less heat, less loss. For any system over about 3 kW, 48V is the practical choice.
I run a 48V system with 16 cells in series (16S configuration). At 5,000W output, that’s only about 100A — manageable with 2/0 AWG cable. The same 5,000W at 12V would need 417A, requiring absolutely massive (and expensive) cabling.
Use our Wire Gauge Calculator to figure out the right cable sizes for your specific setup.
Choosing and Sourcing Cells
Cell Selection
For a DIY build, you’re almost certainly looking at 3.2V prismatic LiFePO4 cells in the 200-320Ah range. Here’s what matters:
Capacity: 280Ah and 304Ah cells are the sweet spot right now. The 280Ah cells have been around for years and are well-proven. The 304Ah cells are newer but use the same form factor.
Brand: EVE, CATL, and Lishen are the big three. EVE LF280K cells are probably the most popular choice in the DIY community. CATL cells tend to be slightly more expensive but have tighter QC.
Grade: Cells are sold as Grade A (new, matched, full spec) or Grade B (may have cosmetic defects, slight capacity variation, or be pulls from other packs). For a primary home system, stick with Grade A. For a shed or workshop battery, Grade B can save you 20-30%.
Where to Buy
- Battery Hookup — US-based, good reputation, sells both new and reclaimed cells
- Current Connected — Another solid US source for raw cells and BMS units
- Amy Wan (Amy Store / Alibaba) — Direct from China, cheapest per cell but longer shipping and you’re handling import logistics yourself
- EG4 (Signature Solar) — Sells raw cells now too, with domestic shipping
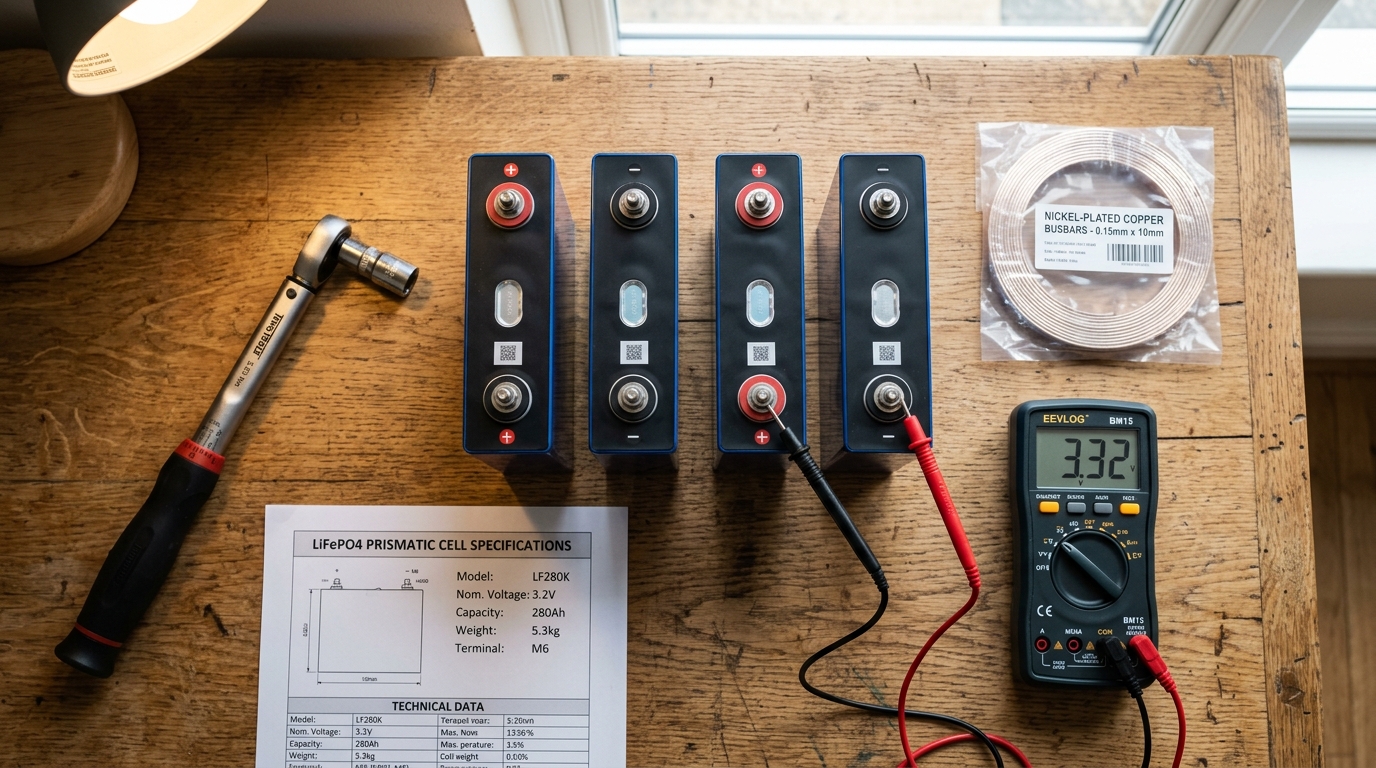
Battery Hookup is a popular source for EVE LF280K cells. Matched sets typically come top-balanced and within 2-3Ah of each other, which can save you the balancing step.
Cell Testing and Matching
If your cells aren’t pre-matched, you need to capacity test them before assembly. This means fully charging each cell to 3.65V, then discharging to 2.5V while measuring total Ah delivered.
Group cells with similar actual capacities together. You don’t want a 272Ah cell in series with a 285Ah cell — the weaker cell will be the bottleneck and will get stressed harder during cycling.
This testing takes time (a full charge-discharge cycle takes 10-20 hours per cell depending on your equipment), but it’s non-negotiable if you want a bank that lasts.
BMS Selection and Sizing
The Battery Management System is the brain of your battery bank. It monitors individual cell voltages, controls charging and discharging, and protects against overcharge, overdischarge, overcurrent, and temperature extremes.
What to Look For in a BMS
Continuous current rating: This needs to match or exceed your inverter’s maximum draw. For a 48V system with a 6,000W inverter, you need at least 120A continuous (6000W / 48V = 125A). I’d recommend 150A+ to give yourself headroom.
Balancing current: Cheap BMS units balance at 30-60mA. That’s painfully slow. Look for at least 1A balancing current — ideally 2A+ — so your cells stay matched without requiring multi-day balance sessions. The JK BMS active balancers are popular for this reason — they move energy between cells rather than just burning off the excess.
Communication: Bluetooth, RS485, or CAN bus connectivity lets you monitor individual cell voltages from your phone or inverter. This isn’t optional in my opinion — you need visibility into your pack.
Temperature sensors: The BMS should have inputs for at least two temperature probes (NTC thermistors), and it should cut charge below freezing (0°C). LiFePO4 cells are permanently damaged by charging below freezing.
Popular BMS Options
- JK BMS (JK-B2A24S15P or similar) — The community favorite. Active balancing at 1-2A, Bluetooth, good software, around $80-150. I run a JK BMS on my main bank and it’s been solid.
- Daly BMS — Older design, passive balancing only, but cheap and proven. Fine for budget builds if you pre-balance your cells well.
- Overkill Solar BMS — US-based support, Bluetooth app, solid build quality. More expensive at $200-400 but good if you want hand-holding.
- EG4 BMS — Pairs well with EG4 inverters via CAN bus communication. Worth considering if you’re running an all-EG4 setup (see our EG4 6000XP review for details on that pairing).
BMS Wiring
The BMS connects to your cell stack via balance leads — thin wires that tap between each cell junction. You’ll have N+1 balance leads for an N-cell series string (so 17 wires for a 16S pack).
The main power path runs through the BMS’s charge and discharge MOSFETs (or contactors on higher-end units). Some BMS designs use a common port (single connection for both charge and discharge), while others have separate charge and discharge ports.
Critical point: The balance leads are connected to full pack voltage at one end. A short circuit on a balance lead can weld itself in a flash. Use insulated ferrules on all balance lead connections and work carefully.
Fusing: Don’t Skip This
Fusing is what prevents a wiring fault from becoming a fire. Every battery bank needs proper fusing, and too many builds cheap out here.
Where to Fuse
-
Main battery positive terminal — A class T or ANL fuse rated for your maximum expected current plus 25%. For a 150A system, use a 200A fuse. This protects the wiring between the battery and your main breaker panel/busbar. Our solar fuses and breakers guide covers the full NEC 156% sizing rule and fuse type selection.
-
Between parallel strings — If you’re paralleling multiple batteries or cell groups, each string needs its own fuse. This prevents one failed string from back-feeding through the others.
-
Charge controller output — Fuse between the charge controller and battery, sized for the controller’s maximum output current.
Fuse Types
- ANL fuses — Good for DC circuits up to about 300A. Cheap, widely available. Not the fastest to blow, but fine for most DIY systems.
- Class T fuses — Faster-acting, higher interrupt rating. Required if your battery bank can deliver more than about 10,000A of short-circuit current (most large LiFePO4 banks can). This is what I use.
- MRBF (Marine Rated Battery Fuse) — Compact, terminal-mount fuses good for smaller circuits up to 300A.
Wire your fuses as close to the battery terminal as physically possible. The wire between the battery and the fuse is unprotected — keep it short.
Assembly: Step by Step
Here’s the process I follow for building a 16S (48V) LiFePO4 battery from raw prismatic cells.
What You Need
- 16x matched LiFePO4 prismatic cells
- 1x BMS (rated for 16S, appropriate current)
- Copper busbars (sized for your max current — I use nickel-plated copper bars)
- Battery compression kit (threaded rods, end plates, side plates)
- Class T fuse + fuse holder
- Appropriate gauge battery cable (use the Wire Gauge Calculator)
- Heat shrink, electrical tape, kapton tape
- Torque wrench (cell terminals have specific torque specs — usually 4-6 Nm)
- Insulated tools
Step 1: Prepare the Cells
Arrange your 16 cells in alternating orientation (positive-negative-positive-negative) so adjacent terminals are opposite polarity. This is how series connections work with prismatic cells — you busbar between adjacent + and - terminals.
Cover the tops of all cells with fish paper or kapton tape, leaving only the terminal bolts exposed. This prevents accidental shorts from dropped tools or busbars.
Step 2: Compress the Cells
LiFePO4 prismatic cells expand slightly during cycling. Without compression, this expansion accelerates degradation. Use a compression frame — aluminum end plates with threaded rods — to apply moderate pressure across the cell stack.
Don’t over-compress. You want firm contact, not crushed cells. I tighten until the stack feels solid with no play, then add maybe a quarter turn.
Step 3: Install Busbars
Working from one end to the other, install copper busbars between adjacent cells. Each busbar connects the positive terminal of one cell to the negative terminal of the next cell.
Torque matters. Use a torque wrench set to the manufacturer’s spec (typically 4-6 Nm for M6 bolts). Under-torqued connections create resistance and heat. Over-torqued connections crack the cell casing seals.
At this point, you have a series string producing approximately 51.2V (16 x 3.2V). This pack can deliver hundreds of amps of fault current — enough to arc-weld metal and cause severe burns. Work with one hand, keep the other in your pocket. Don’t wear jewelry. Use insulated tools.
Step 4: Connect the BMS
Attach the BMS balance leads to each cell junction point, starting from the negative end (B0 or B-) and working up to the most positive cell (B16 or B+). Double-check every connection against the BMS wiring diagram — a swapped balance lead can destroy the BMS instantly.
Connect the main negative lead from the BMS to the pack negative terminal. Connect the main positive lead through your fuse to the pack positive terminal.
Step 5: Connect Temperature Sensors
Adhere NTC thermistor probes to the cells in the middle of the pack (where heat accumulates) and at one end. Route the wires to the BMS temperature inputs.
Step 6: Test Before Full Hookup
Before connecting to your inverter or charge controller:
- Check pack voltage with a multimeter. Should read around 51-54V for a full 16S pack.
- Check individual cell voltages via the BMS app. All cells should be within 0.02V of each other.
- Verify the BMS is communicating and showing reasonable data.
- Test the BMS protection by briefly shorting the sense leads (just kidding — never do this). Instead, verify high/low voltage cutoffs are set correctly in the BMS software: 3.65V per cell max, 2.8V per cell min is a good starting point.
Step 7: Connect to Your System
Wire the battery bank to your inverter/charge controller through appropriate disconnects and overcurrent protection. Set your inverter’s charge parameters:
- Charge voltage: 56.0-57.6V for a 16S pack (3.50-3.60V per cell)
- Float voltage: 53.6V (3.35V per cell) or disable float entirely
- Low voltage cutoff: 44.8-46.4V (2.80-2.90V per cell)
- Max charge current: Per your BMS and cell ratings (typically 0.5C, so 140A for 280Ah cells)
Safety Reminders
Battery builds are one area where mistakes have real consequences.
- 48V at high current can arc-weld metal. A dropped wrench across terminals will melt instantly and shower you with molten metal. Ask me how I know about the divot in my workbench.
- Always disconnect before working on the system. Use a breaker or disconnect switch between the battery and inverter.
- Never charge below freezing. Your BMS should prevent this, but set the low-temp cutoff at 1-2°C to be safe. Charging below 0°C causes lithium plating and permanently damages cells.
- Ventilation matters less than with lead-acid (LiFePO4 doesn’t off-gas hydrogen), but don’t seal your batteries in an airtight box. In the unlikely event of a failure, you want gases to disperse.
- Keep a fire extinguisher nearby. Class D for lithium, or at minimum an ABC dry chemical extinguisher.
Cost Breakdown
Here’s what a typical 48V 280Ah (14.3 kWh) build costs in 2026:
| Component | Cost |
|---|---|
| 16x EVE LF280K 280Ah cells | $1,120 ($70/cell) |
| JK BMS 200A 16S | $130 |
| Copper busbars (nickel plated) | $45 |
| Compression kit | $65 |
| Class T fuse + holder | $40 |
| 2/0 AWG cable + lugs | $85 |
| Misc (heat shrink, ferrules, tape) | $35 |
| Total | $1,520 |
That’s about $106/kWh. An equivalent pre-built 48V battery (like two EG4 LL-S units) would run $2,400-2,800, or $168-196/kWh.
Use the Cost Estimator to price out a complete system including panels, inverter, and balance of system components.
Common Mistakes I See
- Skipping the compression frame. Your cells will swell and degrade faster. Just build the frame.
- Using undersized wire. Run your cable lengths through a Wire Gauge Calculator. Voltage drop adds up fast at 12V (less of an issue at 48V, but still matters).
- No fusing between parallel strings. If you parallel two battery units, fuse each one individually.
- Setting charge voltage too high. 3.65V/cell is the absolute max. I charge to 3.50V/cell (56.0V for 16S) for daily cycling — it reduces stress on the cells and barely affects usable capacity.
- Ignoring the BMS low-temp cutoff. If you’re in a climate that sees freezing temperatures, this isn’t optional.
Final Thoughts
If your new pack refuses to charge on first hookup, don’t panic — our battery not charging from solar troubleshooting guide walks through the most common BMS lockouts and charge-profile mismatches. Building a LiFePO4 battery bank isn’t hard, but it demands respect for the energy involved. Take your time, double-check every connection, and test before you commit to the full system hookup.
The reward is a battery bank that will outlast the rest of your solar system, at a cost that makes the whole project pencil out much faster. On a typical system, the payback period drops by roughly two years when building instead of buying pre-built. Don’t forget that all your battery materials qualify for the 30% federal solar tax credit, which shaves even more off the effective cost.
If you’re still in the planning phase, start with the Battery Bank Calculator or our battery bank sizing guide to figure out how much capacity you actually need, then come back here when you’re ready to build.
Frequently Asked Questions
How much does it cost to build a DIY LiFePO4 battery bank?
A 48V 280Ah (14.3 kWh) DIY build from raw prismatic cells costs roughly $1,500-$2,200 in 2026, or about $106/kWh. The same capacity in pre-built batteries runs $2,800-$4,000, so building your own saves 30-50%.
How many LiFePO4 cells do I need for a 48V battery?
You need 16 cells wired in series (16S configuration). Each LiFePO4 cell has a nominal voltage of 3.2V, so 16 x 3.2V = 51.2V nominal, which is the standard '48V' battery bank voltage.
Can you charge LiFePO4 batteries below freezing?
No. Charging LiFePO4 cells below 0 degrees C (32 degrees F) causes permanent damage through lithium plating. Your BMS should have a low-temperature cutoff, and many quality batteries include built-in heating elements for cold climates.
What BMS should I use for a DIY LiFePO4 battery bank?
The JK BMS is the most popular choice in the DIY community. It offers active balancing at 1-2A, Bluetooth monitoring, and costs $80-$150. Choose a BMS with a continuous current rating that exceeds your inverter's maximum draw by at least 20%.
How long does a LiFePO4 battery bank last?
LiFePO4 batteries are rated for 3,000-6,000+ cycles at 80% depth of discharge, which translates to 8-15 years of daily cycling. This is 8-10x longer than lead-acid batteries, making LiFePO4 cheaper per cycle despite the higher upfront cost.
Anthony
Solar homeowner, EV driver, and DIY builder. Using solar to power a large part of my home.
Get build guides in your inbox
Weekly solar builds, product tests, and technical deep-dives.
Subscribe Free