EG4 6000XP Hybrid Inverter Review: 18 Months of Real-World Data
Short answer: The EG4 6000XP is the best value hybrid inverter for DIY solar builders who want 6kW of continuous output, 120/240V split-phase, and 500V PV input — all for around $1,500. After 18 months of daily use on my system, it’s averaging 94.2% efficiency and has been reliable through two firmware updates. It’s not perfect — fan noise is noticeable, the monitoring app needs work, and firmware updates require a USB stick — but for the price, nothing else comes close. If you can afford a Victron MultiPlus-II, that’s a more polished product, but it costs 3-4x as much for similar output.
Who Makes This and Why I Picked It
EG4 is Signature Solar’s house brand, based in Texas. They’ve built a reputation in the DIY solar community by offering equipment that punches well above its price point. The 6000XP is their flagship all-in-one hybrid inverter — it combines a solar charge controller, battery inverter, and grid-tie interface in a single wall-mounted unit.
I picked up my 6000XP for around $1,450 directly from Signature Solar. The alternatives at the time were the Victron MultiPlus-II 48/5000 at around $4,500 (without a charge controller — add $500-800), the Growatt SPF 6000ES at about $1,200, or the Sol-Ark 12K at $4,000+.
The EG4 won on features per dollar: 6,000W continuous, 12,000W surge, built-in 500V/120A MPPT, 120/240V output, and lithium battery support out of the box.
Specs at a Glance
| Specification | Rating |
|---|---|
| Continuous output | 6,000W (120V or 240V) |
| Surge (5 sec) | 12,000W |
| PV input | 500V max, 120A max, 6,500W max |
| MPPT trackers | 2 independent |
| Battery voltage | 40-60V (48V nominal) |
| Battery charge current | Up to 120A |
| Transfer time | 10-15ms (measured 12ms average) |
| Efficiency | 93-96% (rated); 94.2% measured average |
| Weight | 62 lbs |
| Dimensions | 21” × 18” × 9” |
| Warranty | 10 years |
Installation Experience
Physical Install
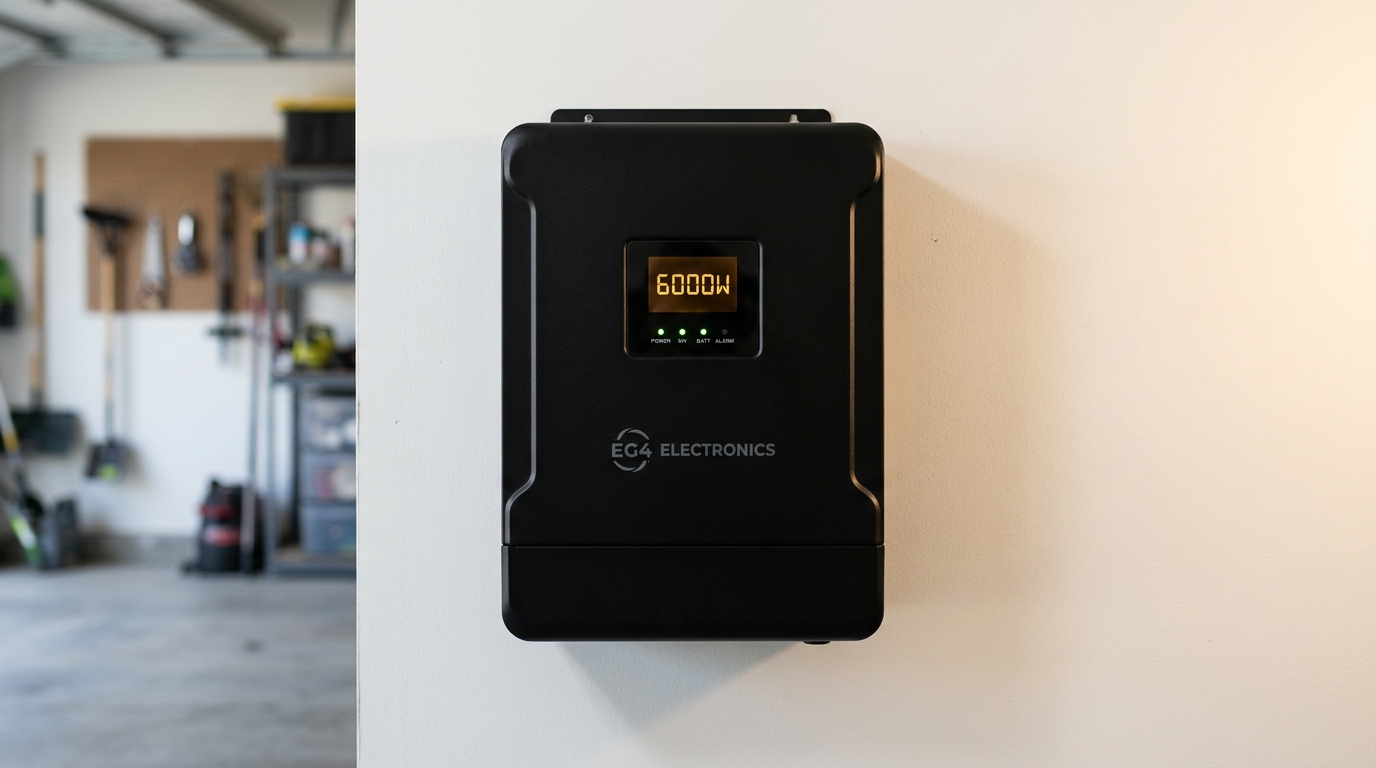
The unit is heavy at 62 pounds, and you’re mounting it on a wall. I used four 3/8” lag bolts into studs and it’s solid. Give yourself at least 12 inches of clearance on the left side for the wiring compartment and 6 inches on top and bottom for airflow.
The wiring compartment is on the left side behind a removable panel. It’s cramped but workable. All connections are clearly labeled on the PCB, and the manual has accurate wiring diagrams — I’ve seen inverters where the manual diagram doesn’t match the actual unit, so that’s a plus.
Electrical Connections
Wiring took me about four hours, including:
-
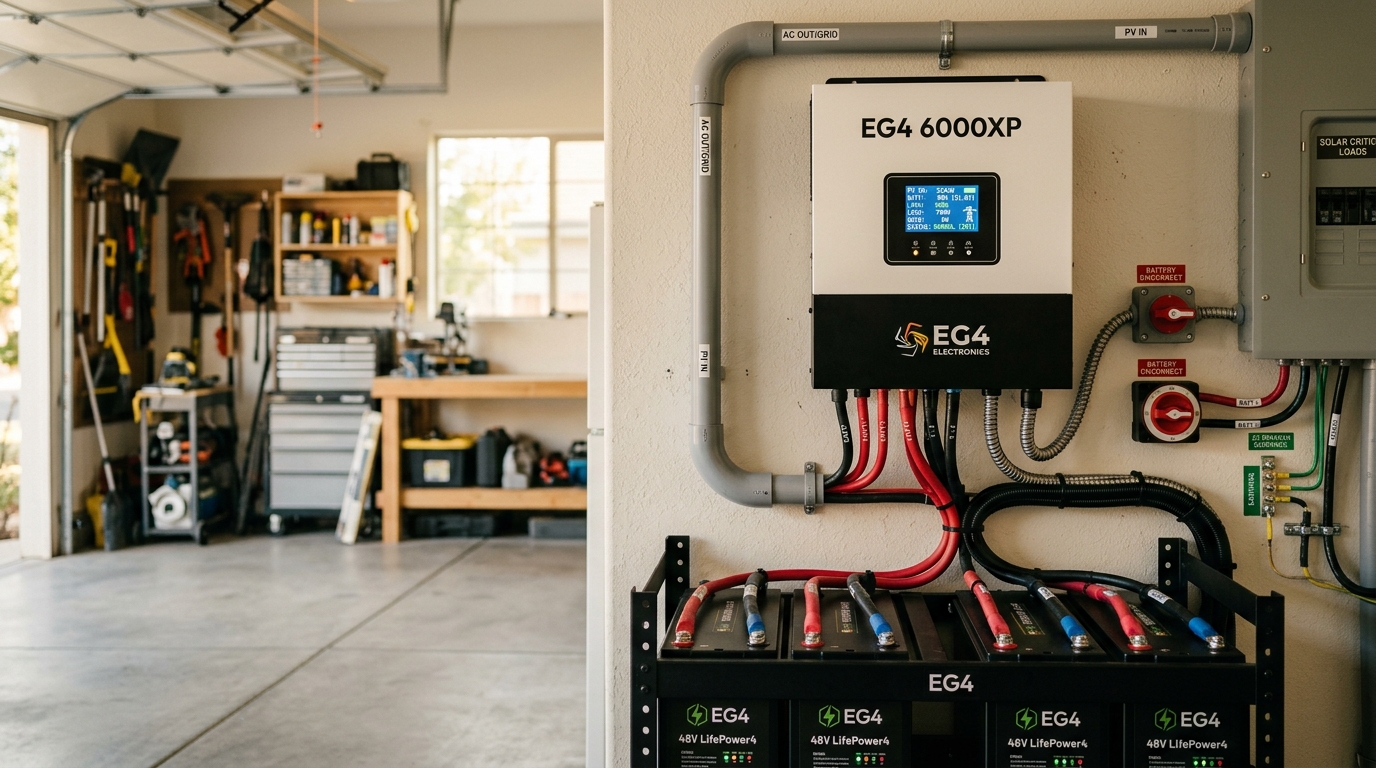
PV input: Two independent MPPT inputs with MC4-compatible connections on the top. I’m running 3S2P on MPPT1 (6 panels, ~1,920W) and 2S2P on MPPT2 (4 panels, ~1,280W). Having two independent trackers means I can have panels on two different roof faces without them interfering with each other.
-
Battery: Heavy gauge connections on the bottom. I’m using 2/0 AWG cable for the 3-foot run to my LiFePO4 battery bank. The 6000XP supports CAN bus or RS485 communication with compatible batteries — I’m using CAN bus with my EG4 batteries and it pulls individual cell voltages, temperatures, and SOC directly. If you’re using a DIY battery with a JK BMS, you’ll need to set charging parameters manually, which works fine too. See our LiFePO4 battery build guide for those settings.
-
AC output: 120/240V split-phase output. The 6000XP produces true split-phase, not the “stacked” approach some inverters use. This means you get proper 240V for well pumps, dryers, and AC units.
-
Grid input (optional): If you’re doing grid-tied or hybrid operation, there’s an AC input for grid power. In my setup, I have grid connected as backup — the system runs off solar/battery primarily and pulls grid power only when the battery hits low SOC. For the full design walkthrough on this kind of configuration, see our grid-tied battery backup guide.
First Power-Up
The initial configuration is done through the front panel LCD or the monitoring app. I set:
- Battery type: Lithium
- Charge voltage: 56.0V (3.50V/cell × 16)
- Float voltage: 53.6V (3.35V/cell × 16)
- Low cutoff: 46.4V (2.90V/cell × 16)
- Max charge current: 100A
- Output priority: Solar first, battery second, grid last
The system was producing power within 30 minutes of flipping the breakers. The two MPPT trackers found their operating points and ramped up smoothly.
Daily Performance: 18 Months of Data
I’ve been logging data since day one through the EG4 monitoring portal and a separate Victron BMV-712 battery monitor for cross-checking.
Power Production
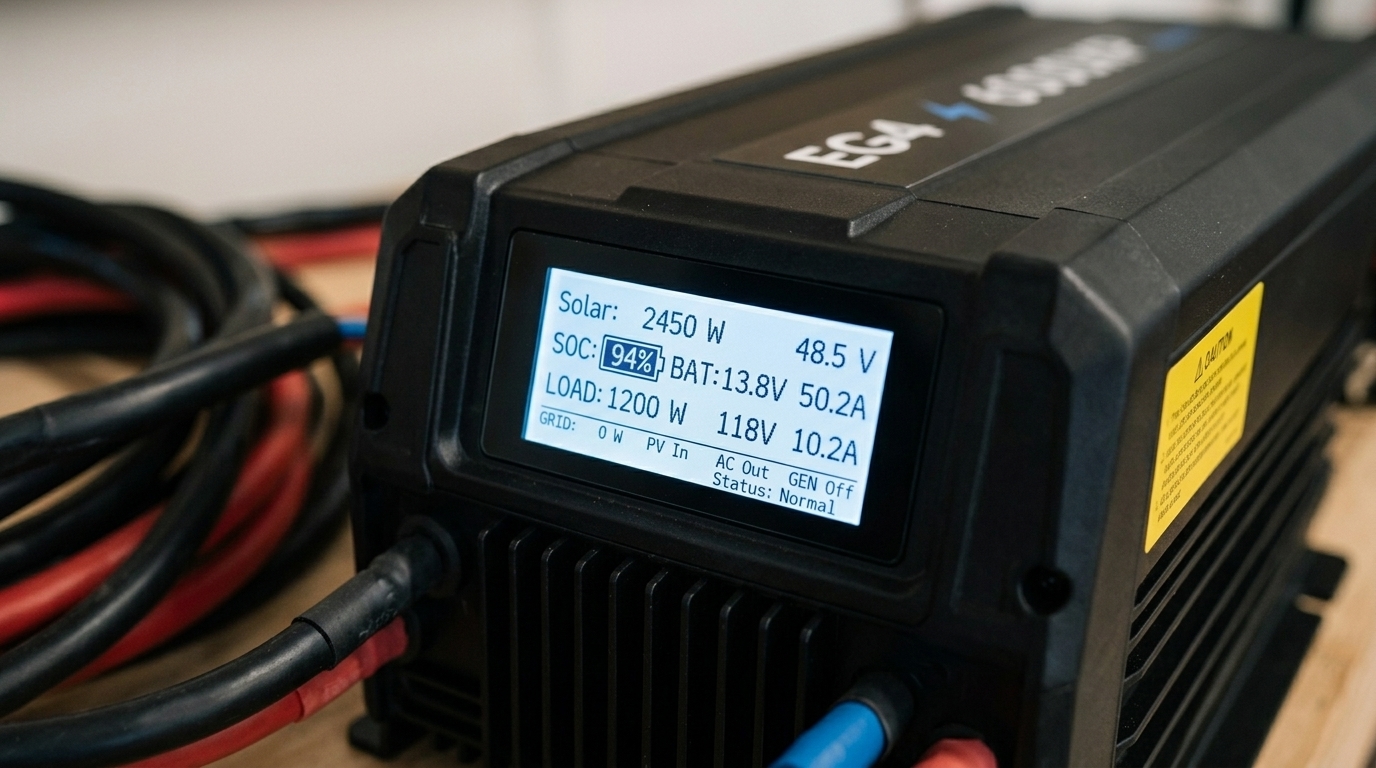
My array produces 3,200W of panels total (10 × 320W older panels — I’ve since planned an upgrade). On a clear summer day in southern New England, I see:
- Peak instantaneous PV power: 2,850-2,950W (panels are derated from their 3,200W nameplate due to heat and real-world conditions)
- Daily production (summer): 16-20 kWh
- Daily production (winter): 6-10 kWh
- Annual production (measured): ~4,600 kWh
The MPPT tracking is responsive and accurate. I’ve compared the 6000XP’s reported PV power against a clamp meter on the DC cables, and the readings match within 2-3%.
Efficiency Measurements
This is where data matters more than spec sheets. I measured round-trip efficiency (PV to battery to AC load) over several full-day cycles:
- PV to battery (charging): 97.1% average
- Battery to AC (inverting): 94.2% average at typical loads (1,000-3,000W)
- Light load efficiency (under 500W): 90.8% — this is where all inverters suffer, and it’s why I don’t run the 6000XP for overnight loads under 200W (I use a small 12V system for that)
- Heavy load efficiency (4,000-6,000W): 93.5%
The sweet spot is 1,500-4,000W, where efficiency stays above 94%. When I’m running the heat pump, kitchen appliances, and a few lights — typical daytime load of about 2,500W — the inverter is humming along at 94-95% efficiency.
Transfer Time
The 6000XP switches between grid and battery/solar power in about 10-15ms. I measured this with an oscilloscope and saw an average of 12ms. This is fast enough that my computers don’t reboot and LED lights don’t flicker, but it’s not UPS-grade (which would be under 5ms). My NAS did hiccup once during a transfer early on, so I put it on a small UPS as a buffer.
For comparison, the Victron MultiPlus-II transfers in under 20ms, and the Growatt SPF series is around 10-15ms, so the EG4 is competitive here.
What I Like
Two Independent MPPT Trackers
This is huge for real-world installations. My panels are split across two roof faces — south and west. With a single-tracker inverter, I’d need to compromise on the wiring configuration or buy a separate charge controller. The dual independent trackers handle different panel counts, orientations, and even different panel models without issue.
I’m pulling about 1,800W from the south-facing array and 1,000W from the west-facing panels on a typical afternoon. Use the Solar System Sizer to figure out optimal panel layout for your situation.
500V PV Input
The high voltage input ceiling means you can string more panels in series, which reduces current and allows thinner, cheaper wire runs from roof to inverter. My longest run is about 45 feet and I’m using standard 10 AWG PV wire. At lower voltage, I’d need 6 or 4 AWG. Check what you need with the Wire Gauge Calculator.
CAN Bus Battery Communication
When paired with a compatible battery (EG4’s own batteries, or others that speak the same CAN protocol), the inverter pulls real-time cell-level data. I can see individual cell voltages, pack temperature, BMS status, and accurate SOC on the inverter’s display and app. This eliminates the guesswork of voltage-based SOC estimation.
10-Year Warranty
For a $1,500 inverter, a 10-year warranty is outstanding. Victron offers 5 years. Growatt offers 5 years (extendable to 10 for a fee). Signature Solar has a US-based support team that’s been responsive when I’ve contacted them — hold times are usually under 10 minutes.
Price
$1,400-1,600 for a 6kW hybrid inverter with dual MPPT, 120/240V, and 10-year warranty. That’s roughly the cost of just the Victron inverter alone, without its charge controller. Run the full system cost through our Cost Estimator and you’ll see how much the inverter choice affects total project budget. And remember, the inverter qualifies for the 30% federal solar tax credit, bringing the effective price closer to $1,000.
What I Don’t Like
Fan Noise
The cooling fan is loud — not “across the room” loud, but noticeable in a living space. Above about 2,000W, the fan kicks to high speed and produces a steady hum around 45-50 dB. I measured 47 dB from 3 feet at 3,000W load.
My inverter is in the garage, so it doesn’t bother me. If you’re mounting this in a utility closet near a bedroom, you’ll hear it. The Victron MultiPlus-II is noticeably quieter at comparable loads.
The fan also runs for a few minutes after the load drops, cycling on and off with intermittent moderate loads. Mildly annoying but not a real problem.
Monitoring App
The EG4 monitoring app (available for iOS and Android) works, but it’s not polished. Data sometimes lags by 5-15 minutes, the UI is clunky, and historical data is limited to about 30 days of detailed graphs.
For real monitoring, I use the inverter’s Modbus interface with Home Assistant. This gives me real-time data, long-term logging, and custom dashboards. But that requires a Home Assistant setup, which isn’t exactly beginner-friendly.
Victron’s VRM portal is significantly better here. It’s the one area where the price difference really shows.
Firmware Updates via USB
Firmware updates require downloading a file, putting it on a USB stick (formatted FAT32), inserting it into the inverter, and navigating the LCD menu. It works, but it’s a hassle compared to the over-the-air updates that some competitors offer.
I’ve done two firmware updates in 18 months. The first fixed a bug where the grid-tie mode occasionally dropped connection during cloud transients. The second improved MPPT tracking at very low light levels. Both updates went smoothly, but I had to hear about them on the Signature Solar forum — there’s no automatic notification.
No Built-In Generator Management
If you want to integrate a backup generator, you need an external automatic transfer switch (ATS). The Victron MultiPlus-II has built-in generator start/stop and management. For my setup this doesn’t matter since I have grid backup, but for fully off-grid systems, it’s an extra component and cost.
Idle Consumption
The 6000XP draws about 55-65W when energized but not serving a load. Over 24 hours, that’s 1.3-1.6 kWh of battery capacity just to keep the inverter alive. On my system that’s about 10% of daily winter production going to the inverter’s own overhead.
For comparison, the Victron MultiPlus-II draws about 18-25W at idle. That’s a meaningful difference over a year, especially in winter when every kWh counts.
I deal with this by using the inverter’s scheduled power-on feature — it shuts down at 11 PM and turns back on at 6 AM, saving about 0.5 kWh per night. A small 12V inverter handles the overnight loads (router, security cameras, fridge).
How It Compares
vs. Victron MultiPlus-II 48/5000
The Victron is a better-built product with superior software, lower idle consumption, quieter operation, and a massive community ecosystem. The VRM monitoring portal alone is worth something. But it costs $4,500+ and doesn’t include a charge controller (add $500-800 for a SmartSolar MPPT). You’re looking at $5,000-5,300 for roughly equivalent capability.
Choose Victron if: Budget isn’t your primary constraint, you want the best monitoring/software experience, or you’re building a commercial install where reliability is paramount.
Choose EG4 if: You want 80% of the Victron experience at 30% of the cost, and you’re comfortable with occasional firmware quirks.
vs. Growatt SPF 6000ES
The Growatt is slightly cheaper at ~$1,100-1,200 but only has a single MPPT tracker with a lower voltage input (450V vs 500V), and the warranty is 5 years vs 10. Build quality feels a step below the EG4 in my hands-on experience with both. The Growatt’s monitoring app is marginally better than EG4’s, though.
Growatt has had some issues in the DIY community with inconsistent firmware quality and slower US-based support response times. To be fair, EG4 had early firmware issues too, but they’ve been more responsive about fixing them.
Choose Growatt if: You’re on a tight budget and only need a single MPPT tracker.
Choose EG4 if: You want dual MPPT, higher PV input voltage, and longer warranty for a modest price increase.
vs. Sol-Ark 12K
The Sol-Ark is in a different class — 12kW output, built-in generator management, excellent software, and premium build quality. It’s also $4,000-5,000. If you need 12kW or want a fully featured system that handles every edge case, the Sol-Ark is hard to beat. But if 6kW is enough for your needs, you’re paying double for capability you won’t use.
Firmware History and Reliability
In 18 months, I’ve experienced:
- Zero hardware failures. No blown MOSFETs, no failed displays, no burnt connections.
- Two firmware bugs. The grid-tie dropout issue (fixed in v1.4) and an occasional SOC display glitch when switching between PV-priority and grid-priority modes (fixed in v1.6).
- One planned reboot. After the first firmware update, the inverter required a manual restart. It didn’t come back automatically as the release notes suggested. A quick power cycle fixed it.
Overall reliability: I’d rate it 8.5/10. It’s not Victron-level bulletproof, but it’s been solid for a $1,500 unit. The 10-year warranty gives me confidence that Signature Solar stands behind it.
Installation Tips from My Experience
-
Mount it on an exterior wall or in a well-ventilated space. The heat output is significant at sustained loads. My garage stays a few degrees warmer on heavy production days.
-
Use a dedicated 60A breaker for the AC output. The 6000XP can deliver 50A continuous at 120V. Don’t share a circuit.
-
Run the battery cables as short as possible. The 120A charge/discharge current on 48V means even small cable resistance matters. I used 2/0 AWG for a 3-foot run and see almost zero voltage drop.
-
Connect the ground wire. Obvious, but I’ve seen installs on forums where people skip the equipment ground. The metal chassis needs to be properly grounded.
-
Set up Modbus monitoring early. Even if you don’t use Home Assistant, the Modbus data over RS485 or TCP gives you much better insight than the built-in app.
-
Update firmware before going live. Check the Signature Solar downloads page for the latest version. The improvement from v1.0 to the current version is substantial.
Who Should Buy the EG4 6000XP
Yes, buy it if:
- You’re building a DIY solar system under $15,000
- 6kW continuous output meets your needs (covers most homes except heavy AC loads)
- You want dual MPPT trackers for flexible panel placement
- You value long warranty over premium software
- You’re comfortable with occasional firmware updates via USB
No, skip it if:
- You need UPS-grade transfer times (under 5ms)
- Quiet operation in a living space is non-negotiable
- You want a polished, set-and-forget monitoring experience
- You need built-in generator management for off-grid
- Your loads regularly exceed 6kW continuous
The Bottom Line
Eighteen months in, I’d buy the EG4 6000XP again. It’s paid for itself in grid savings, it’s been reliable, and the 10-year warranty means I’m not worried about longevity. The fan noise and app quality are real drawbacks, but they don’t affect the core function of turning sunlight into usable power efficiently and reliably.
For a DIY solar builder working with a real-world budget, the 6000XP hits the sweet spot of capability and cost. Pair it with a solid LiFePO4 battery bank and properly wired panels, and you’ve got a system that genuinely offsets or eliminates your electricity bill. Use the Battery Bank Calculator to figure out the right capacity and configuration to match the 6000XP’s input specs.
Frequently Asked Questions
Is the EG4 6000XP good for DIY solar?
Yes. The EG4 6000XP is the best-value hybrid inverter for DIY builders in 2026. It offers 6kW continuous output, dual MPPT trackers, 120/240V split-phase, and a 10-year warranty for around $1,500. After 18 months of daily use, it averages 94.2% efficiency.
How loud is the EG4 6000XP?
The cooling fan is noticeable above 2,000W loads, measuring about 47 dB from 3 feet at 3,000W. It is fine in a garage or utility room but may bother you in a living space or near a bedroom. The Victron MultiPlus-II is quieter at comparable loads.
How fast does the EG4 6000XP switch to battery during an outage?
The transfer time is 10-15ms (measured 12ms average). This is fast enough that computers stay running and LED lights do not flicker, but sensitive equipment like a NAS may benefit from a small UPS buffer.
Can the EG4 6000XP work with non-EG4 batteries?
Yes. While it communicates natively with EG4 batteries via CAN bus, it works with any 48V LiFePO4 battery by manually setting charge parameters. Many builders pair it with DIY battery banks using JK BMS units.
What is the idle power consumption of the EG4 6000XP?
The 6000XP draws about 55-65W when energized but not serving a load, consuming 1.3-1.6 kWh per day. The Victron MultiPlus-II draws only 18-25W at idle. You can mitigate this by using the scheduled power-on feature to shut down during low-demand overnight hours.
Anthony
Solar homeowner, EV driver, and DIY builder. Using solar to power a large part of my home.
Get build guides in your inbox
Weekly solar builds, product tests, and technical deep-dives.
Subscribe Free